Wednesday, April 3, 2013
Mitsubishi Lancer Engine Service Manual
Download: Mitsubishi Lancer Engine Service Manual
2009 BMW 1 Series Owner’s Manual
Download: 2009 BMW 1-Series Owner’s Manual
Audi TT DIY B5 A4 Pre 99 5 BPV DV Install
I changed my BPV / DV (bypass valve / diverter valve) today (710N), so I snapped some pics and thought Id post in case anyone was interested.
I have a 1997, so the BPV is NOT in the same spot as most A4s. Its located higher up, and you really cant get to it from below. So, there is no need to jack up the car for this.
Tools needed:
1. Flathead and Phillips screwdriver.
2. Size 30 Torx socket attachment (for the headlight removal).
3. Small Hands.
Optional:
- Extra Vacuum hose. Size 3.5mm or 5/32".
- Little clamps for vac hose that you replace (can get at www.ecstuning.com). Or just use zip ties.
STEP 1: Remove airbox cover pieces.
Just pop off the plastic covers over the air box (you DO NOT have to remove the airbox, just the covers). The cover pops off, and the flex snorkel too. The little snorkel piece in the front has two screws holding it in.
STEP 2: Remove Headlight.
Theres three torx screws holding in the headlight. First pop out the sidemarker (this if for those with 2-piece). Then youll see the side screw. The other two are right on top of the headlight.

You can then pull out the light, and can easily pop off the wiring connector (just push the little silver clip down, and the plug comes out) then you can completely remove the headlight housing.
Heres what you see when you look in:

STEP 3: Loosen clamps to move the hose from the air box out of the way.

Just loosen the two clamps (number 1 and 2 in the pic) enough to you can move that big flex hose enough to get better access to the BPV clamps. Number 3 is optional if you think it will give you better access. That is the connector to the N75 valve. Theres a silver clip you can push in and pop off that connector. Just be careful with it.
Heres the hoses removed:

STEP 4: Get to the BPV!
Now when you hold that big hose out of the way, you should able to get a decent view of the BPV (which is behind the fan).

Theres two flathead screw clamps holding the BPV on to each hose attached to it. One of them you cannot get to yet. The first is a bit tricky. I put one arm in through the headlight hole to hold the BPV and clamp at an angle where I could get the screwdriver on it from above. Its a bit frustrating but very do-able. After you loosen it enough, pull that end of the BPV out of that hose. The other end (towards the IC piping) of the BPV is still attached. You should now be able to weasel your way over to that clamp to loosen.
Now the BPV is basically free. The only thing still attached should be the vacuum hose going to the manifold.

Remove that vac hose. If the hose is old/brittle then you should replace it now. The hose size is 5/32 inches (available at Autozone), its also the same as the 3.5mm ID hose.
Now hook up your new BPV to the vac hose, and put it all back together and check for leaks via your boost gauge. If you dont have a boost gauge, stop modding your car and get one before you bother modding!

search terms: changing BPV bypass valve DV diverter valve 710N 97 how to change BPV write-up install installing installation instructions puting in new BPV
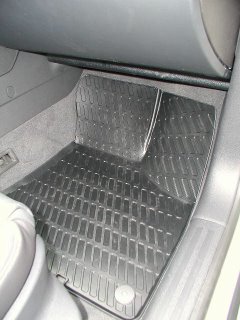
Audi A3 Euro Rubber Floor Mats
Some sort of all-weather mats are an absolute necessity. Carpet mats are magnets for grit, salt stains, etc., and cant be hosed off and put back in right away. I looked at all the options:
- Hexomat, like my cargo liner
- WeatherTech (had them in a previous car, liked them a lot)
- Audi Monster mats, which are similar to the WeatherTech design but have A3 printed on them
- Audi Euro Rubber mats
I ordered them from AutoWebAccessories, which sells genuine accessories at a discount. They were backordered nationwide, but I got mine as soon as they were available in the country. They work great, and I highly recommend them.
One problem was that the snaps were so tight that they could have ripped the fastener out of the carpet. Scraping the inside of the snap on the mat with a knife made them snap on well, but not insanely tight. They give the interior a neat, sporty look. In the photos below they look like they contrast a lot with the carpet, but thats mostly due to the camera flash. In reality, the black mats are very subtle against the black carpet:


Coding the Control Module for the Audi TT Coupe
The Audi TT comes with several pre-programmed functions in the central locking control module that can be accessed by using the VAG 1551/1552/5051 tools (available to Audi dealers), or PC emulation programs such as the old VWTool, Baums VDS-PRO, or Vag-Com from Ross-Tech. These tools can be used to check your cars diagnostic codes, but they also allow you to make certain modifications to the default programming.
Listed below are several of the codes that will modify the central locking control module in the Audi A4 to access some of the hidden features available on these cars. Please note that Audi of America does not officially recognize that these codes exist and some dealers are unwilling to make modifications to the factory control module coding. You assume all responsiblity and liability associated with these modifications.
To make modifications to the factory settings, numbers are added to and subtracted from the default setting code numbers. Below is a table thatb lists several of these functions and the programming required to access these functions. The value is the number added to or taken away from the default programming.
Please note that these codes are for cars in the North American market.
| Function | Value |
| Add Window Up/Sunroof close, and Window Down with remote.* | +64 |
| Add 1 touch unlock of both doors | -04 |
| Remove horn honk when arming | -1024 |
| Auto lock/unlock of doors (Doors lock at 15 mph and unlock when key is removed) | +32 |
The coding depends on which radio is installed in your car from the factory. The table below shows the total coding value for certain functionality packages that I have experimented with.
| Functions | Coding with Concert Radio |
| (Factory Default)Safety Central Locking**Horn sounds when armingLights flash when arming | 15884 |
| Window control with remote1 touch unlock of both doorsNo horn sound when armingLights flash when arming | 14920 |
| Window control with remote1 touch unlock of both doorsHorn sounds when armingLights flash when arming | 15948 |
| Window control with remoteSafety Central Locking**Horn sounds when armingLights flash when arming | 15952 |
| Window control with remoteSafety Central Locking**No horn when armingLights flash when arming | 14924 |
| Window control with remote1 touch unlock of both doorsNo horn sound when armingLights flash when armingAutomatic door lock/unlock | 14952 |
| Window control with remote1 touch unlock of both doorsHorn sounds when armingLights flash when armingAutomatic door lock/unlock | 15976 |
| Window control with remoteSafety Central Locking**Horn sounds when armingLights flash when armingAutomatic door lock/unlock | 15980 |
| Window control with remoteSafety Central Locking**No horn when armingLights flash when armingAutomatic door lock/unlock | 14956 |
**Safety Central Locking - 1 press of unlock opens drivers door, 2nd press opens passenger door.
Coding Instructions (emulation software)
1. Plug your your computer with emulation software loaded into the Data Link Connector (OBDII port) in your car. This Data Link Connector is located on the drivers side, below the dash, close to the door. Start software. You should see a list of the different modules available.

2. Select your control module that you want to recode. In this case, its the Central Locking control module. In a direct entry address system (VAG1551/1552) enter address word 35 (Central Locking).
3. Your screen should show the current coding of your control module listed as Software Coding.

4. You want to Recode the control module. You dont need to Login to do this. Select Recode.
5. Enter the coding that you want from the above list, depending on the features you desire, make sure your numbers are correct, select Do It or press enter.

6. Your new features should be available immediately.
Coding Instructions (VAG 1551/1552)
1. Plug your your VAG tool into the Data Link Connector (OBDII port) in your car.
2. Rapid data transfer. Insert address word XX should be displayed. Press buttons 3 and 5 to insert Central Locking address word 35. Press Q button to confirm the input.
3. Rapid data transfer. Select function XX should be displayed. Press buttons 0 and 7 to select Code Control Module function 07. Press Q to confirm the input.
4. Code Control Module. Enter code number XXXXX (0-32000) should be displayed. Enter control module coding number from above table using the keypad. Press Q to confirm the input.
5. Display will show control module identification and that the coding has been entered. Press the arrow button.
6. Rapid data transfer. Select function XX should be displayed. Press buttons 0 and 6 to select End Output function 06. Press Q to confirm the input.
7. Disconnect your VAG tool from the Data Link Connector.
Please note: Beware when attempting to code a 98 or newer VW/Audi with an aftermarket radio. The adapter harness that is supplied by the aftermarket ties the "K" line to VBatt. Any service tool or computer that is used on the vehicle may be damaged unless it has been properly fused.
Since these items are not coded from the factory to be readily accessible, and Audi of America does not officially recognize these modified codes, you assume all the risks involved with re-coding your central locking control module. Audi TSB 98-07, which can be found at tech.vw.com covers some changes to the central locking control module that Audi of America does recognize. Please be aware that dealers may charge you for this service, or they may not be willing to perform this service. Some dealers may be unfamiliar with the fact that you can re-code the central locking control module, or they may re-code the central locking control module to factory settings. It would be a good idea to keep a copy of this document with the car in case any questions arise.
When forwarding and making copies of this document, please keep it intact.
Tuesday, April 2, 2013
2011 Audi A3 Owners Manual brochures
Download: 2011 Audi A3 Owners Manual brochures
2010 Subaru Foresterd Owner Manual
Before you operate your vehicle, carefully read this manual. To protect yourself and extend the service life of your vehicle, follow the instructions in this manual. Failure to observe these instructions may result in serious injury and damage to your vehicle.
Table of content 2010 Subaru Forester Owners Manual
- Seat, seatbelt and SRS airbags
- Keys and doors
- Instruments and controls
- Climate control
- Audio
- Interior equipment
- Starting and operating
- Driving tips
- In case of emergency
- Appearance care
- Maintenance and service
- Specifications
- Consumer information and Reporting safety defects
- Index