Sunday, May 26, 2013
Choosing tractor service manuals
The current change and advancement in technology has led to the making and design of different types of machines. A good example of machines that are changing with this technology is the tractor service manuals. In the past, choosing such a service manual was very simple and easy. This was because of the fact that there were few tractors. In the present day however, there are many companies that make tractors. From these companies, you also find that there are unique makes and models of tractors. As a result, tractor service manuals are of different types. This means that one need to have the necessary information that is required to know which of the tractor service manuals they buy.
Before making a decision, there are some things that you should consider about tractor service manuals. The first thing is the part of the tractor that you want to service. In most cases, a tractor is serviced on the engine. However, there are some times that you need to service the body of the tractor. Whichever part one is servicing, they need to have tractor service manuals that are used to service the particular part.
If you are going to service the engine, you should get repair manuals that are used to service the engine. If you are servicing the body, then the tractor service manuals you get should be the ones that have information on servicing the body. The second thing that you should have in mind is the type of service that you are going to do.
In most cases, servicing of a tractor is done on a monthly basis. This is the case when a person needs to service a tractor that is used a lot. If your tractor is used occasionally, you can service it at least once every three months. Good tractor service manuals show you the right directions to do the service. They also have the types of tools and materials that you are in need for a good service. Tractor service manuals that are very simple and do not show examples of the materials that you use for the service should be avoided. This is due to the fact that you might end up doing a service that is very shallow. As a result, your tractor will end up getting problems often.
Finally, tractor service manuals should have a step by step guide that has diagrams. A manual that is simply made by use of text is found to be quite difficult to use. This is because of the terminologies that are found in the manual. A person who does not have experience in handling mechanical objects will not be able to understand mechanical jargon. Lack of understanding the text in the tractor service manuals can lead to incomplete or wrongly done service. When you follow these steps that have been illustrated, you are able to get a service manual that will be compatible with the tractor that you have.
Wednesday, May 15, 2013
Service Manual Mitsubishi EVO VII

This is the most complete book online for Service Manual Book Mitsubishi EVO VII is about the specifications of a car, and how the use of safety for this car . Mitsubishi is a good Car with the best machine settings.
If you want to know about Mitsubishi car you can read this ebook. This is aproper assessment PDF content you have as a owner of the car :
Download here :Service Manual Book Mitsubishi EVO VII Link
Suzuki M109 back download the Kit Installation Manual

Rear lowering Kit Installation: 1. remove the under plate with the bike so that it can be placed in an elevator. Protect the motorcycle lift for motorcycles and motorcycle lift the rear wheel therefore is un-weighted. 2. remove the cover on the front of the drive shaft. Remove the regulator/rectifier.
This can be turned off during this procedure. 3. then remove the screw holding the spring shock to the suspension and then the two screws attaching the stock support arm (the arm support inventory only seems reduction kitwith our, but is slightly smaller). 4. install your new lowering arms, leaving a small respite screws. Install the shock spring back to the binding support. You may need to increase or decrease the rear tyre to get it to align correctly. 5. tighten all screws securely. Reinstall rectifier bracket, the regulator/rectifier and the lid of the axis. 6. Remove the motorcycle of the lift and testing that the suspension does not stick or bind.
Download Complete Suzuki M109 back download the Kit Installation Manual.
Under cover removal and installation for 2002 Acura RSX

to install the cover is equipped with if the accessory power socket connector and seat heater switch connectors are properly connected to confirm. No BOSE sound system puts the gloves to protect the note in your hands. Careful not hurting dashboards and related parts.
1. Write down the confirmation preset radio frequency identity theft prevention code [radio there. Remove the 2 dashboards Center low cover. 3 Removes the middle panel, and then remove the two mounting bolts. 4. Disconnect the audio unit connector (A) the antenna lead (B), hazard warning switch connector (C) removes audio unit the information avaliable here
Tuesday, May 14, 2013
Service manual for Honda XR 650

This ebooks talk about the specification motorcycles, and how the safety use for this bike. Honda XR-650 is good motorcycles with best engine setting. If you want to know about this honda motorcycles you may read this ebooks. This is the PDF content review:
Repair Manual, Engine Manual, Engine electrics, Service Manual, Fuel preparation and control, Fuel tank and lines, Exhaust system, Clutch, Gearbox, Steering, Brakes, Frame, Manual Diagram, Wiring diagram, Exhaust Muffler, Frame Manual cover, Lubrication, Switch, Temperature Gauge, Carburetor control, Front break, Manual guide, Rear brake, Engine Fuel System, Engine Lubrication and Cooling, Engine Combustion System, Repair Manual, Transmission System, Front Wheel and Steering System, Rear Wheel System, Engine Removal and Installation, BMW, Electrical System, Troubleshooting, Radiator, Characteristics, Maintenance, Suspensions, Braking System, Chassis, Radiator, Cooling System, General electrical, Lights equipment, Serial number, Cylinder head, Workshop Manual, Fenders and Exhaust Pipe, Equipment, Valves Cylinder, Piston, carbureter, carburator, carburetor, RepairManual, Gear box, Honda XR-650 Service Manual
Download the complete manual book guide Honda you want to complete more and as much just here in ebookpdf.thesisfull.com as faforit your website,, Download here PDF Manual Books Service Honda XR-650 , this e books you can download from the original, file in this site Ok success always We hope this books is useful for you.
Citroen Catalogues Pieces Auto Transmission

This parts compose covers Citroen Transmission Parts Book only, and is ranging from the followers coefficient typewrite: BV-MA, BV-SA13, BVA-MB3, BV-BE4R, BVA-AL4, BV-BE5, BVA-4HP14, BV-BE 4X4, BV-ML5T, BVA-4HP20, BVA-4HP18, BV-ME5T, BE3R, BE4R (and writer !) that are fitted on the pursuing Citroen vehicles:
Citroen AX, Citroen Saxo, Citroen Chanson, Citroen C3, Citroen ZX, Citroen Xsara, Citroen Xsara Sculpturer, Citroen BX, Citroen Xantia, Citroen C5, Citroen XM, Citroen Mercantilism, Citroen C15, Citroen Berlingo, Citroen Jumpy, Citroen Jock, and Citroen C25. The compose is develop in at smallest 5 contrasting faculty for the saki of readability.
download
Renault 21 Reference Identification Guide
Renault models listed: Twingo, Espace I, R 25, R 11, Super 5 / Express, R 9, R 21, Alpine A 610, R 19, Safrane, Laguna, my Clio, Espace II, Megane I, II, Clio, Kangoo , Master II, Espace III / Avantime, Spider, Laguna II, Mascott, Vel Satis, Espace IV, II & Traffic Megane II.free download
BMW 5 Series Service Manual
BMW 5 Series Service Manual Contains
- Maintenance Program
- Engine General
- Engine Removal and Installation
- Cylinder Head Removal and Installation
- Cylinder Head and Valvetrain
- Camshaft Timing Chain
- Lubrication System
- Ignition System
- Battery, Starter, Alternator
- Fuel Injection
- Fuel Tank and Pump
- Radiator and Cooling System
- Exhaust System
- Transmission General
- Clutch
- Manual Transmission
- Automatic Transmission
- Gearshift Linkage
- Drivershaft
- Suspension, Steering and Brakes General
- Front Suspension
- Steering and Wheel Alignment
- Rear Suspension
- Final Drive
- Brakes
- Body General
- Fenders, Engine Hood
- Doors
- Trunk Lid
- Exterior Trim, Bumpers
- Door Windows
- Interior Trim
- Central Locking and Anti Theft
- Seats
- Sunroof
- Convertible Top
- Electrical System General
- Electrical Component Locations
- Wipers and Washers
- Switches and Electrical Accessories
- Instruments
- Exterior Lighting
- Heating and Air Conditioning
- Radio
- Seat Belts
- Airbag System (SRS)
- Electrical Wiring Diagram
Monday, May 13, 2013
Nissan Frontier 2005 Service Repair Manual
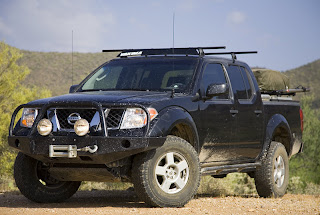 This manual contains maintenance and repair procedures for the 2005 NISSAN FRONTIER model D40 series.
It covers the entire vehicle from start to finish, as used by professional mechanics to service or repair your vehicle. It is based on step by step instruction & highly detailed exploded pictures to show you how to complete the required job correctly & efficiently.
Contains:
GENERAL INFORMATION
General Information
ENGINE
Engine Mechanical
Engine Lubrication System
Engine Cooling System
Engine Control System
Fuel System
Exhaust System
Accelerator Control System
TRANSMISSION/TRANSAXLE
Clutch
Manual Transmission
Automatic Transmission
DRIVELINE/AXLE
Transfer
Propeller Shaft
Front Final Drive
Rear Final Drive
Front Axle
Rear Axle
SUSPENSION
Front Suspension
Rear Suspension
Road Wheels & Tires
BRAKES
Brake System
Parking Brake System
Brake Control System
STEERING
Power Steering System
RESTRAINTS
Seat Belts
Supplemental Restraint System (SRS)
BODY
Body, Lock & Security System
Glasses, Window System & Mirrors
Roof
Exterior & Interior
Instrument Panel
Seat
AIR CONDITIONER
Manual Air Conditioner
ELECTRICAL
Starting & Charging System
Lighting System
Driver Information System
Wiper, Washer & Horn
Body Control System
LAN System
Audio Visual & Telephone System
Auto Cruise Control System
Power Supply, Ground & Circuit Elements
MAINTENANCE
Maintenance
download Nissan Frontier 2005 Service Repair Manual
Kymco People 125 150 motorcycle owner manual

Wiring Diagram and Service/Repair Procedures of Kymco People 125/150 motorcycle, which have 125cc and 150cc cylinder volume and Overhead Camshaft engine type respectively.
Contents:
* ENGINE FRAME VIN SERIAL NUMBER
* SPECIFICATIONS (125 CC)
* SPECIFICATIONS (150 CC)
* SERVICE PRECAUTIONS
* TORQUE VALUES
* TOOLS
* LUBRICATION POINTS
* CABLE & HARNESS ROUTING
* WIRING DIAGRAM (125 CC)
* WIRING DIAGRAM (150 CC)
* TROUBLESHOOTING
download here
Manual Audi A4 Cabriolet 3 0 Litre Multitronic pdf
 the chance to savor open-air motoring are obviously pupil attractions of the new Audi A4 Rig, but theres also plentifulness of matter behindhand thecars seductive façade. Discipline, design, hit and sumptuosity all place highly in the Cabriolet, and unitedly, alter it a knockout contender amongst its wealthiness cabriolet/convertible rivals.
At $105,370, the A4 Carriage is dearer than the Volvo C70 certificate ($98,000), but cheaper than the BMW 330Ci couch ($110,700 - auto) and the Mercedes-Benz CLK320 equipage ($128,974). The forward of the new A4 Rig models to succeed in Australia is powered by a high-tech all-alloy 3.0 litre V6 engine that features figure variably-timed camshafts, shifting size intake manifolds and squad valves per cylinder. A 1.8 litre turbocharged quartet cylinder var. that delivers peak torque from 1950 rpm reactionist through to 4700 rpm, is set for start soon after the V6. Pricing for the 1.8 litre help has not yet been declared. Both these engines are paired to Audis multitronic transmission. With its infinitely varied ratios, this machinelike provides seamless knowledge transportation when tract to its own devices in Force fashion. Alternatively, the utility can superior recitation mode whereby six electronically stored ratios are easy Hair (EDL) and Anti-Slip Control (ASR). Anti-lock brakes and brake help are also criterion. The passive country package includes seatbelt strength limiters and pre-tensioners for all four passengers, full-size foremost airbags and advanced surface airbags with both caput and pectus shelter. Added device is provided by two overprotective exerciser down the place passengers that are triggered within milliseconds in the circumstance of a rollover.
download here
Volvo XC90 Model Year 2006 Driving Dynamics


Service Manual Suzuki RF 900R
 Guy here are Suzuki RF 900R Repair Manual guide is a maintenance troubleshooting and instruction. owner manual reference used for maintaining, just disassembly and servicing the The Expectation that information should be Authors book service manual It provides comprehensive information on identifying Drivers Handbook features, components, and spare parts troubleshooting problems Authors book and performing disassembly procedures the most
 for more info you can download the Suzuki RF 900R pdf or rar below echo Suzuki RF 900R hosted in rapidshare mediafire and hotfiles the most Suzuki RF 900R Manual info General and Information Engine Mechanical Engine Lubrication System Engine Cooling System Engine Control System Fuel System Exhaust System. if you need please download here
Sunday, May 12, 2013
Free Stuff Yamaha YZF 350 Banshee
 In other you must pay in here are Free Get now Yamaha YZF 350 Banshee Repair Manual guide is a maintenance troubleshooting and instruction. owner manual reference used for maintaining, has disassembly and servicing the No shop just for free this Table of Contents Features service manual It provides comprehensive information on identifying features, components, and spare parts troubleshooting problems Table of Contents Features and performing disassembly procedures standard .
System. if you need please download here
1975-1979 Honda GL 1000 Windjammer IV Vindicator II Mounting Guide

These instructions explain the procedure required to mount either the Windjammer IV or Vindicator II fairing to your motorcycle. We urge you to follow the preparation and assembly sequence from start to finish. This will benefit you directly in several ways:
You will be assured the fairing is properly installed and is immediately ready for operation.
You will minimize unnecessary confusion, moaning and scraped knuckles.
You will protect your investment by doing it right, and
With the confidence that nothing has been overlooked, you won’t have to waste time backtracking to correct mistakes. That’s time you could spend riding.
Prepare the motorcycle
Put the motorcycle on its centerstand. Remove the 3 phi Hips head screws in the headlight shell. Disconnect the 3-prong plug and remove the headlight. It will not be reused.
Detach the right and left turn signal wires from their connectors: 2 green ground wires, 1 orange (left) and 1 light blue (right) turn signal wires, and 2 brown/white running light wires.
Unscrew the amber reflectors on each side of the nacelle. Remove the rubber grommets and put the reflectors aside to be reused.
REMOVE THE TURN SIGNALS CAREFULLY. PULLING TOO HARD ON THE WIRES WILL BREAK THE CONNECTIONS AT THE BULB.
Pull the turn signal wires out of the headlight nacelle. Pull down on the plastic strain relief on the headlight stays and remove the relief from the wires.
Remove the rubber grommet behind the nacelle bracket.
Unscrew the stalks and pull the wires through the mounting holes. (Illus. ?)
If you are installing a Vindicator, put the turn signals aside to be remounted.
If you are interesting to download this motorcycles manual online pdf file, we found this download links information from google search engine, at this site www.craigvetter.com . And, you can easy to get this from this link Manual 1975-1979 Honda GL 1000 Windjammer IV Vindicator II Mounting Guide.pdf
Download Fiat Punto Service Repair Manual
maintenance operations, Installation, Removal, Disassembly, Assembly,
Repair, Troubleshooting, Schematics, Wiring Diagram, Maintenance, Repair
Guide, Datasheets component identification and unit repair, along with
service specifications for the Fiat Punto.
- Living With Your Fiat Punto
Roadside repairs ~ Weekly checks ~ Lubricants and fluids ~ Tyre pressures - Maintenance
Routine maintenance and servicing - Repair And Overhaul
- Engine and associated systems
Transmission ~ Brakes and suspension ~ Body equipment ~ Wiring diagrams
Tuesday, April 30, 2013
2012 Subaru Forester Owners Manual
Saturday, April 27, 2013
2013 BMW 3 Series Owners Manual Guide Pdf
 |
| Google Images |
Friday, April 26, 2013
2013 Chevrolet Avalanche Review User Manual Owners Pdf
Vehicles square measure lots like farm products; they often don’t age fine. nobody desires to drink milk that’s been disregarded for per week or eat dairy product that’s adult a fuzzy inexperienced beard. a similar is true of cars and trucks.
 |
| Google Images |
There’s very nothing new report regarding the Avalanche’s exterior. It’s a similar handsome vehicle that’s been on the marketplace for over [*fr1] a decade. theres one minor modification although. All models gain “Black Diamond” badges on the bed’s flying buttresses.
Another factor value noting is that the truck’s panel gaps. They’re extraordinarily tight and consistent – nearly as good or higher than those of a German luxury sedan. This attention to detail very offers the impression the Avalanche could be a high-quality machine.
The same direct style theme carries through within. The truck’s dashboard is cleanly titled and logically set out, in contrast to the Ford F-150’s interior as an example, that appearance blockish and overdone. in addition, the truck’s gauges and controls square measure simple to scan and straightforward to use.
Declining sales square measure a significant reason for this move. The truck reached its celestial point back in 2003 once dealers sold over ninety three,000 of them, however the Avalanche’s panopticon performance steady declined then. once the last one rolls off the road the corporate estimates itll have delivered over 600,000 of them over its life.
“It very took off the primary couple years,” aforementioned Tom Wilkinson, Communications Manager for Chevrolet Trucks. “When we tend to introduced the Avalanche there have been no [light-duty] crew-cab pickups,” he said.
But all of that modified round the middle of the last decade. Four-door versions of different trucks, together with Chevrolet’s vastly standard Silverado began to draw in would-be Avalanche consumers, that began to push this utility vehicle off the mountain. just like the natural disaster it’s named once, the resultant sales slide was unbeatable.
Friday, April 12, 2013
1999 Audi A6 Sedan Timing Belt Service and Repair Manual
Download: 1999 Audi A6 Sedan Timing Belt Service and Repair Manual
Thursday, April 11, 2013
New 2006 Honda Pilot Owners Manual

Download : New 2006 Honda Pilot Owners Manual
Brake Introduction

CONTINUOUSLY VARIABLE TRANSMISSION


Wednesday, April 10, 2013
2004 Porsche Cayenne Owners Manual

2004 Porsche Cayenne Review
Performance:
- 3.200 cc 3.2 liters V 6 front engine with 84 mm bore, 95.9 mm stroke, 11.5 compression ratio, double overhead cam, variable valve timing / camshaft and four valves per cylinder
- Premium unleaded fuel 91
- Fuel economy EPA highway (mpg): 19 and EPA city (mpg): 15
- Multi-point injection fuel system
- 26.2 gallons of premium unleaded fuel tank game
- Power: 184 kW, 247 HP SAE @ 6.000 rpm, 229 ft lb, 310 Nm @ 2.500 rpm
Dual Clutch Transmisson

About 2012 Ford Focus ST Specs and Owners Manuals

Behind The Wheel
Feels tight and solid in an almost BMW-like way. Tuned for fuel efficiency, the auto is slow to downshift.
Statistics
Engine : 2000cc 4-cylinder 16-valve turbo, 247bhp @ 5500rpm, 250lb ft @ 1750rpm
Transmission : Six-speed manual, front-wheel drive suspension MacPherson
Performance : 6.5sec 0-62mph, 154mph, 39.2mpg, 169g/km
How heavy / made of? 1362kg/steel
2012 ford focus st owners manual includes a really simple. But, you can exploit the best. Here, you will see how minor repairs to cars ford focus st 2012.
Double clutching
Principle of Suspension System
- To restrict road vibrations from being transmitted to the various components of the vehicle
- To protect the passengers from road shocks
- To maintain the stability of the vehicle in pitching and rolling
Sunday, April 7, 2013
Hydraulic Pump 2819 and 2820 HYDRAULIC HAND PUMPS Instruction Manual
Download: Hydraulic Pump 2819 and 2820 HYDRAULIC HAND PUMPS Instruction Manual
FORD ARIES F450 F550 PARTS AND SERVICE MANUAL
Find a suitable road crossing to position the vehicle on rail. If necessary set up cautionary devices to ensure safety. 2. Position the vehicle with the road wheel tires on the rails, and the rail wheel flanges positioned centrally above the railhead. Backing into position is usually easier. 3. Put the vehicle’s transmission into park or neutral. Set the parking brake. 4. Engage the PTO hydraulic pump or start the auxiliary hydraulic power source. 5. The rear will be placed on rail first. a. Raise the rail gear up a bit to relieve the pressure on the lock hook. b. Pull the T-handle for the lock to swing the hook out of the way. c. Lower the rail gear into position on the rail. d. Release the T-handle for the lock. 6. Check the alignment of the front rail wheels with the track – it might be necessary to adjust the position of the vehicle. 7. The front rail gear will now be lowered. a. Raise the rail gear up a bit to relieve the pressure on the pin lock. b. Remove the both pins from the upper holes. c. Lower the rail gear. d. Install the lock pins in the lower holes. 8. Engage the steering lock. 9. Drive the vehicle forward and backward a few yards to check vehicle’s operation and brakes. 10. Vehicle is now ready for rail travel.
Download: FORD ARIES F450-F550 PARTS AND SERVICE MANUAL
Saturday, April 6, 2013
Automotive Service Manual A Valuable Entity For Vehicle Owners
Friday, April 5, 2013
Alfa Romeo 156 Car Test Owner manual
Download: Alfa Romeo 156 Car Test Owner manual
HYUNDAI ACCENT 1 6 litre 3 door hatch
engine capacity has been enlarged from 1.5 litres to 1.6 litres. At the same time, the gear
ratios in both manual and automatic versions have been re-jigged and wheel size has gone
from 13 inch to 14 inch. The power steering assistance has been increased at parking speeds and decreased at highway speeds, and the rear suspension has heavier duty lateral links. A range of measures designed to reduce noise, vibration and harshness have been introduced to improve the Accent’s general driving feel. Equipment upgrades include the addition of a tachometer, a change to an electrically driven speedo and odometer, three adjustable rear seat head restraints (but still only a lap belt in the centre) and separate retractable cupholders in the dash. Interior trim fabrics have also been upgraded.
Download:HYUNDAI ACCENT 1.6 litre 3-door hatch
2003 08 Toyota 4Runner Signal Mirror Installation Manual
Download: 2003-08 Toyota 4Runner Signal Mirror Installation Manual
2007 Propietario Honda Fit Manual
Descarga: Manual de 2007 Propietario Honda Fit
1985 93 Alfa Romeo Spider Service manual Catalog
Introducing a multi-stage, automotive insulation and sound damping system to give older Alfa Romero cars the “quiet riding comfort” found in today’s new cars. AcoustiSHIELD kits are designed on current “state-of-the-art” auto acoustic technology, to insulate and control the noise, vibration and heat in the passenger cabin. Kits are pre-cut and come with easy-to-follow installation instructions- —-everything you need to do the job right.
Download: 1985-93 Alfa Romeo Spider Service manual Catalog
Thursday, April 4, 2013
Installing Stage III HID Headlights
I first have to say that at the time of this article HID4LESSs Stage III HIDs are not out yet. I am the first TT to test them. I was given a great opportunity to test them so I took it.
Lets start off and discuss a few factors that are important regarding HIDs.
1. Projector-lenses are a vital factor for proper HID conversion. Projectors give the xenon light that bluish-white color when viewing them slightly off axis. Audi makes the
best projectors in the industry. This is why so many boy-racers are buying up wrecked Audi headlights. If you have factory projector-lenses your half way there, If not you
can get them from HID4LESS.
2. Quality of xenon bulb. The rule here is if the bulb isnt German (ie. Philips/Sylvania) pass them up. German bulbs have a much higher standard of quality.
3. Quality of Ballast. German ballast are a must. Hella makes a good ballast for stage1 and stage2 (35Watt). Auerswald is the only company (as of now) that makes a stage III 50Watt ballast. Auerswald is a German company that makes ballast for Submarines, Race-cars, etc.. Their Ballast are extremely durable.
4. Color of xenon bulb. Regardless what anyone claims, 4300K Philips bulb is the BRIGHTEST bulb available. It burns a bluish-white color when used with a projector-lens. Pure white without projector-lenses.
6000k Philips Ultinon bulb has a slightly less output and burns a Bluish-purple, with or without projector-lenses. This bulb was designed for cars without projectors. It gives that projector light-show to cars without projectors. Any bulb higher in color temp is not a German bulb and will cause glare and diminished output.
This is Important. True bulb color is achieved after a burn in time of 100 hours. Philip 4300k bulb makes the most change from whitish-blue to a more bluish-white color.
Many people put in a 4300k Philips bulb and are un happy with the color. They dont give the bulb time enough to burn-in to the Bluish-white everyone wants.
There are other factors like bulb placement etc.. but better companies like HID4LESS
takes care of those issues.
Now that I got that out of the way I will explain what HID4LESSs Stage III HIDs are.
Stage III use a 50W Auerswald ballast and a 4300k Philips bulb. (without any decrease in bulb life) The factory HIDs use a 35Watt ballast and a 4300k Philips bulb.
Output of the Stage III is around 5200 Lumens. (Lumens is a true measure of light output) AWESOME! Output of the factory HID is around 3200 Lumens.
This photo shows a pre burn-in comparison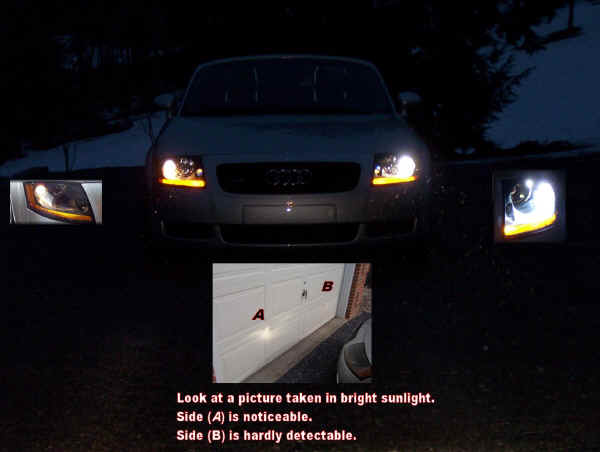
The TT Roadster quattro Twin-Intercooled Turbo is tight to work in but it can be done without taking the bumper off.
Step1. Open hood and take the battery and coolant cover off.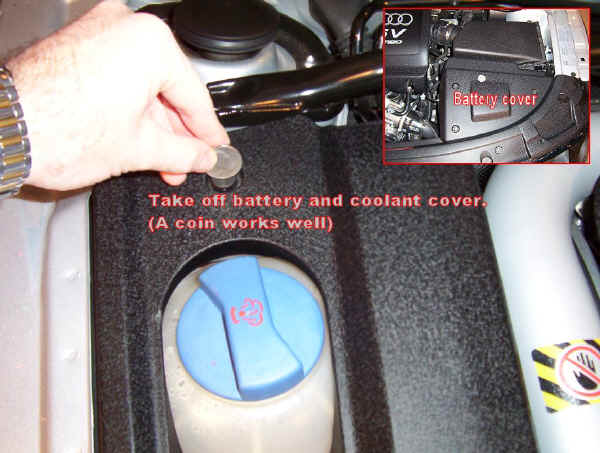
Step 2. Take the dust-covers off by snapping the wire retaining clip off. Remove H1 or H7 bulb by unsnapping bulb-wire clip.
Step 3. Cut larger holes in dust-cover.
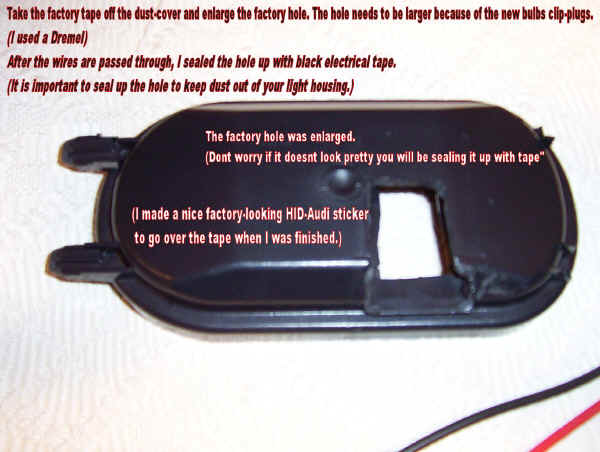
Step 4. Install xenon bulb carefully in light housing. (make sure wire on bulb faces down.) There should be little indents in the base of the bulb that should fit into the factory housing. This insures proper bulb alignment. 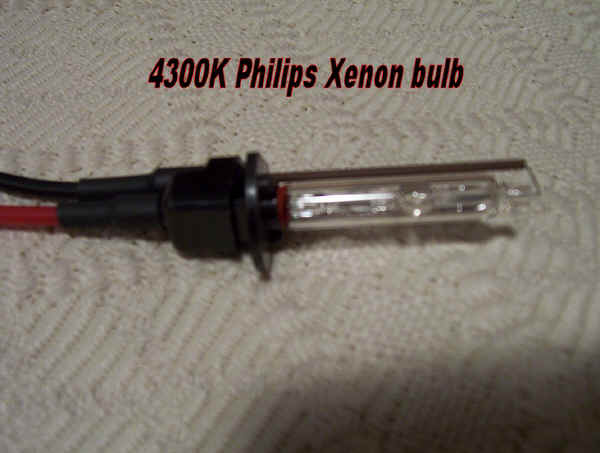
Step 5. Bend bulb retaining wires so the new xenon bulb fits snug. I wont lie to you, this take some effort to bend it just right. I used needle-nose pliers. Have a little patients and dont brake the wire retaining clip. The TT Twin-intercooled motor is real snug under the hood and the driver side light does not give you much room to work. Any other model should be easier.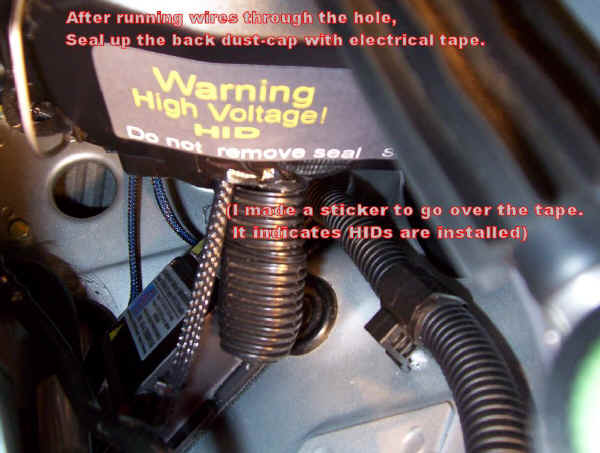
Step 6. mount the ballast and igniter near the light with Velcro. I mounted it on the fender-well.
Step 7. Run your wires through dust-cap and snap bulb and power wires to the new harness. HID4LESS suggest taping all wire-connections with black electrical tape.
Some cars might have to bend the factory female -neg. power supply a bit larger to
accept the new HID male spade.
Step 8. Tape up dust-cap as good as you can and reinstall battery and coolant covers.
Adjust your new STAGE III HIDs.
I found taking photos of the STAGE III HIDs hard to do. Its like taking a picture of the sun.

The photos dont do the new STAGE III justice. The are much, much brighter in person.
ALL HID PHOTOS ARE PRE-BURN-IN COLOR
The new output of these lights is much greater than the factory HIDs. The light is crisp and bluish-white. with 4300 Philips bulbs. The draw rate to start the new 50w ballast is only 6.8amps and 3.3amps to run. It does not set off the "bulb out" light either. HID4LESS uses heavy gauge wires. They are the industry leaders in my opinion.
The cost of the new STAGE III isnt yet determined but they are the ultimate HID system.
If your after greatest light output with the factory bluish color. Use the 4300k Philips bulb.
If your looking for a cosmetic look of purple, use the 6000k Philip Ultinon bulb.
This lighting system makes a great impression on the road. Everyone moves out of your way when passing. (and Im sure thats often for most of us!)
Audi TT DIY Proper Use Of An Instant
Ok, you’ve reached that point where your anal about car care. You’ve invested time and money on proper car care products. You’ve spent a day or two, here and there, getting your car looking its best, you’ve polished, and waxed or sealed, now how do you keep it looking like that throughout the week, until your next wash? Not long ago, instant detailers (id’s) came along. Mothers, and Meguiars were two of the first car care companies to introduce it, under names Showtime and Quick Detailer, respectively. These are both good products when used for light cleaning of the vehicles surface. You simply spray on the surface, and wipe clean with a soft cloth…..it can’t be that easy, or can it?
It can be! But with so many instant detailers out there, which one should you choose? You could choose from Meguiars, Mothers, Black Magic, Zymol, Eagle One, etc. These all have their place, somewhere in car care. I guess if I had to pick one of the above, I would go with either Eagle Ones, or Mothers version. They are both very good, and reliable. There are also a few products available online which in my opinion are exceptional products. Clearkote, Poorboys, Adam’s (brand new), are a few.
Lets get to basics with instant detailers, what can and can’t they do?
First off I want to make clear, that these products are not intended to replace normal washing routines. There simply designed to remove light grade contaminants from the vehicles surface, i.e. dust, fingerprints, and an occasional visit from a seagull, when you’re in a pinch (no pun intended). You should always carry at least a 4oz bottle of ID when you’re on the road for these types of emergencies.
ID’s are really great for maintaining that just washed/waxed look. Some can be used on windows (Clearkote Quikshine is even recommended for glass, matter of fact, the only thing you cant use it on is your tires). Some are difficult to get off if over sprayed on windows, so read directions on the back label.
There very easy to use, your basically going to use the same technique you do while drying your car. Spray a light mist on the surface (in shade preferably), wipe with microfiber polishing towel in the same direction as you remove your polishing and wax/sealant products (This will remove contaminants). Turn towel over, and buff to finish (This will create the shine).
Most products will have either a polymer, carnauba, or silicone content which will deter further dirt and or dust from accumulating. Truly a time saver and can really extend the life of sealant or wax currently protecting your car. Most “speed details” only cost from about $.30 to $.75 per job, so a real affordable alternative to the bucket and sponge! Just keep in mind, this is a between washes, product, not intended to replace the bucket and sheepskin wash mitt!
Audi A4 B5 DIY Valve Cover Gasket
First take off your engine cover and coilpack. The coilpacks are held in by a 5mm allen bolt (not sure if they are bolted down on newer motors) Now located the 5 10mm nuts that will need to be removed as well as the grounding wire. Remove these bolts using an untightening pattern similar to that of a lug bolts. Also unclip the 2 clips holding on the timing belt cover (located at the very front of the motor)
Next pull off the valve cover as well as the gasket making sure not to get any dirt in the motor.
After that clean off the mating surfaces on the head and the valve cover with a clean rag. Dont forget the center 4 holes for the spark plugs as well. After this apply a very light layer of gasket sealer/rtv along both the front and back of the motor especially in the corners and the "v" part of the head. Also apply to the matching side of the valve cover. (In the pic I only have the corners done but do all the way across the front and back of the motor.)
Finally put the gasket and valve cover on and torque the bolts down to 7ft/lbs, using a tightening pattern similar to that of lug bolts.
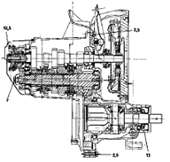
Mitsubishi Pajero Montero 2000 Workshop Manual
Download: Mitsubishi Pajero / Montero 2000 Workshop Manual
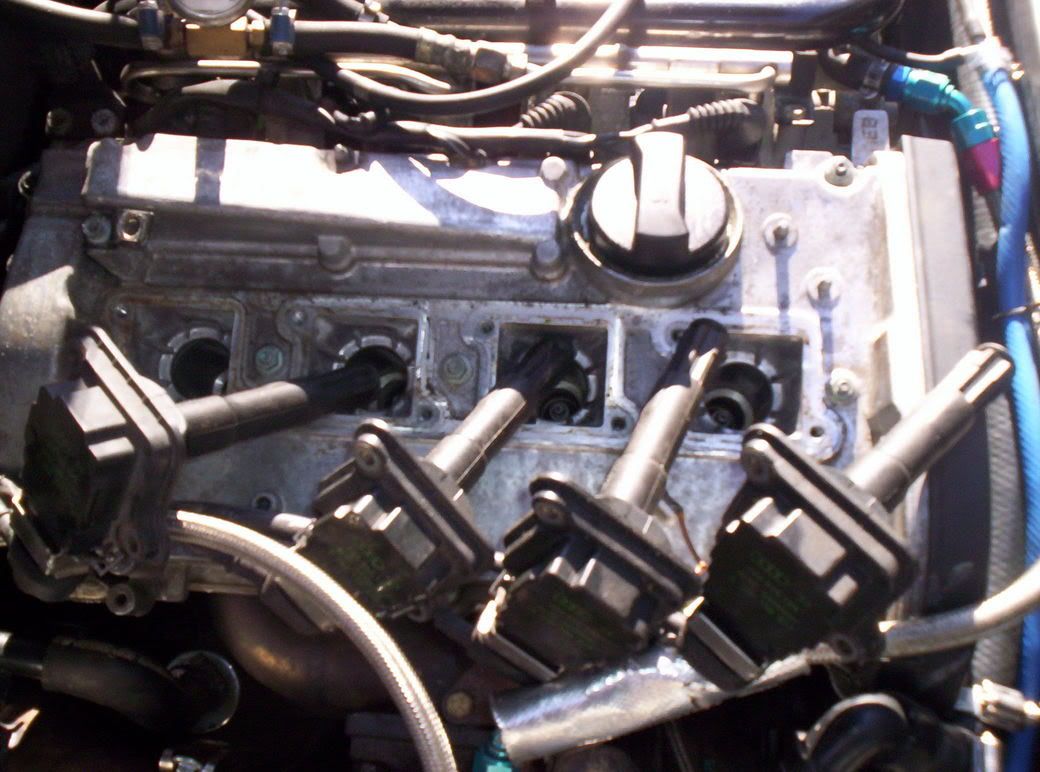
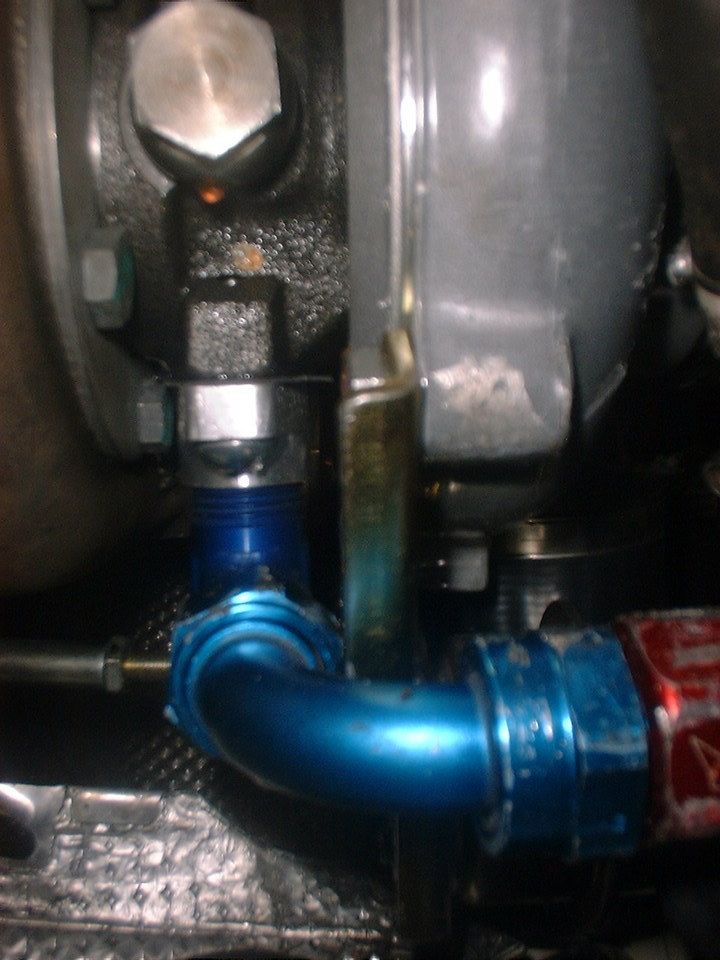
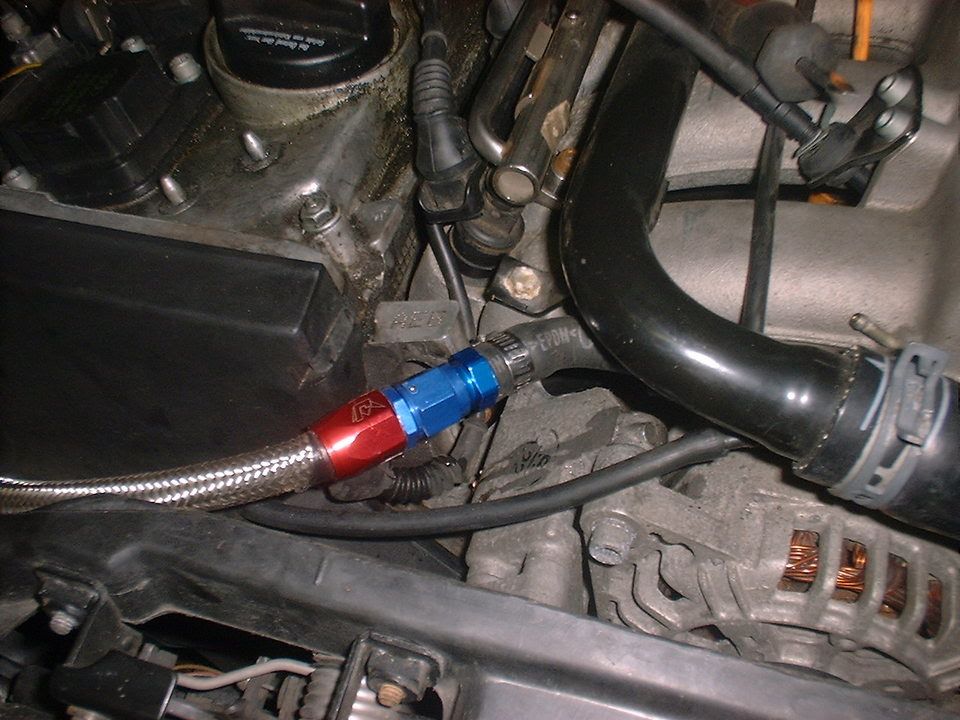
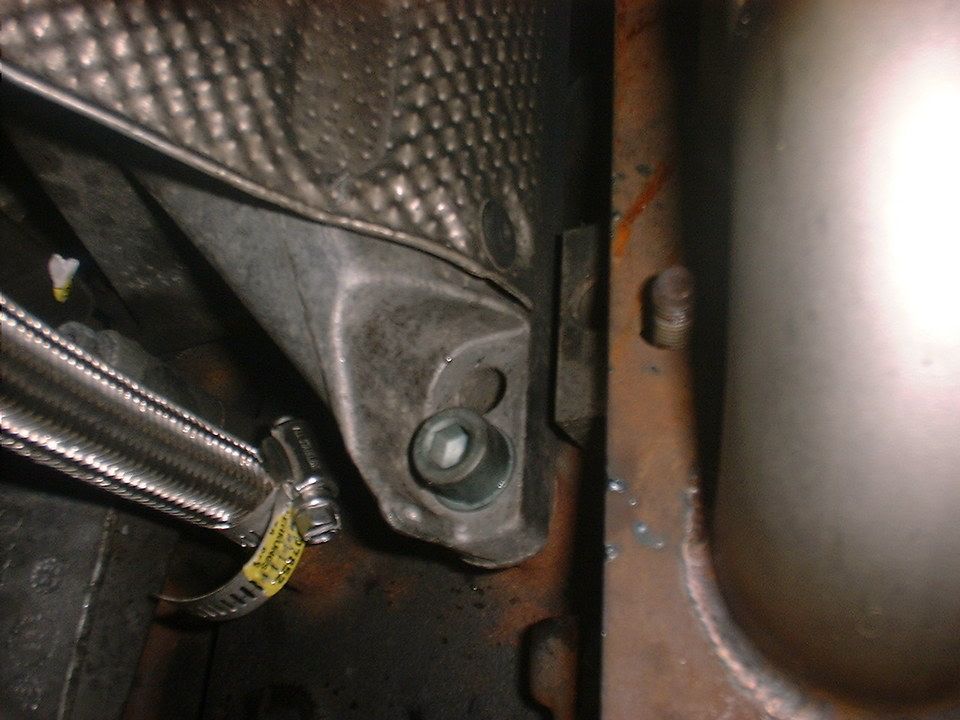
Audi A4 GT28RS Answers
Disclaimer #s I SUCK AT SPELLING AND DONT PROOFREAD
Parts
gt28rs turbo
gt28rs -> v-band adapter
3" test pipe
3" downpipe
upgraded exhaust
exhaust manifold with t25 flange
v-band
exhaust manifold gasket
copper sheet (make your own gaskets, all atps surfaces are not flat)
misc hardware
2 90 degree silicon bends
vr6/2.75" maf housing
misc clamps
3" filter
3" metal pipe
turbo to f hose adapter
440cc injectors
walbro 255lph fuel pump
adjustable fpr
fp gauge
These fittings
oil filter housing to 4an adapter
2 atp cnc banjo bolts and fittings
atp cnc machined oil pan adapter
gasket material (dont use atps)
misc clamps
manual boost controller,
10 of silicone tubing
a couple tee connectors
dv
fmic
clutch (capable of 400+ tq
programming
vag-com
wideband a/f (highly recommended but not necessary)
misc hardware/gaskets, etc
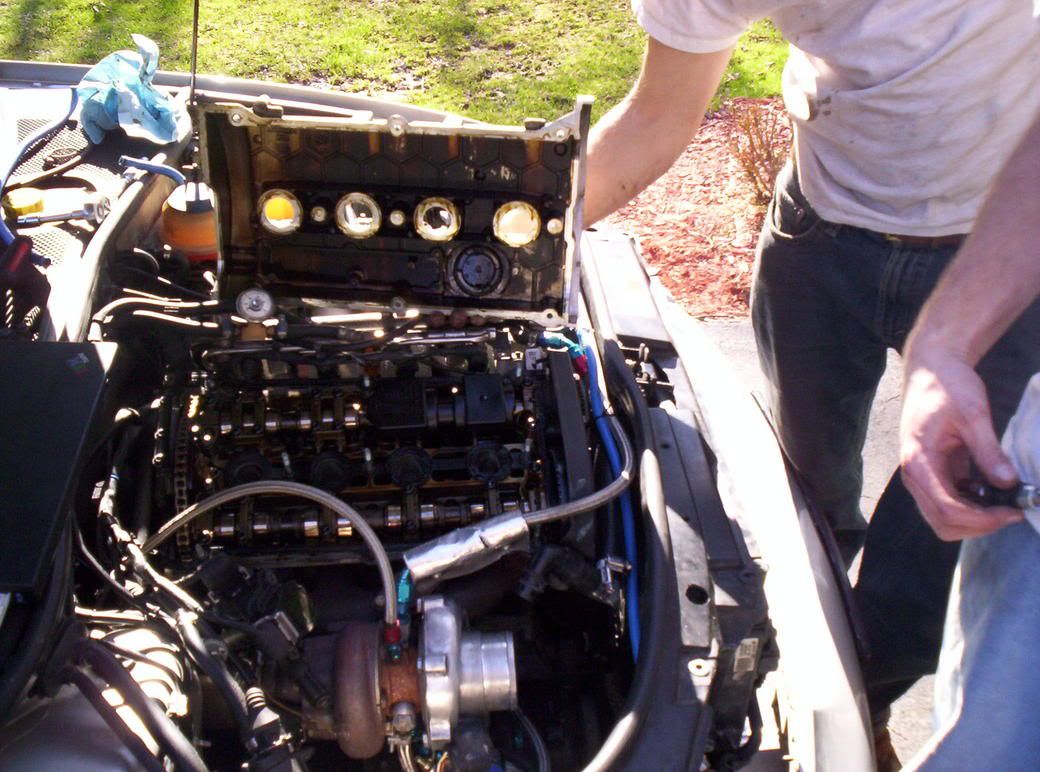
Installation
*Give yourself at least 4 days of downtime. My car took 4 days 18hrs a day to get installed and running, but i didnt buy the atp kit.
**This is not plug and play, and keep in mind you WILL be under the hood every weekend getting things right again.
-First remove old turbo and all related parts, oil/coolant lines, intake pipes, cat, etc
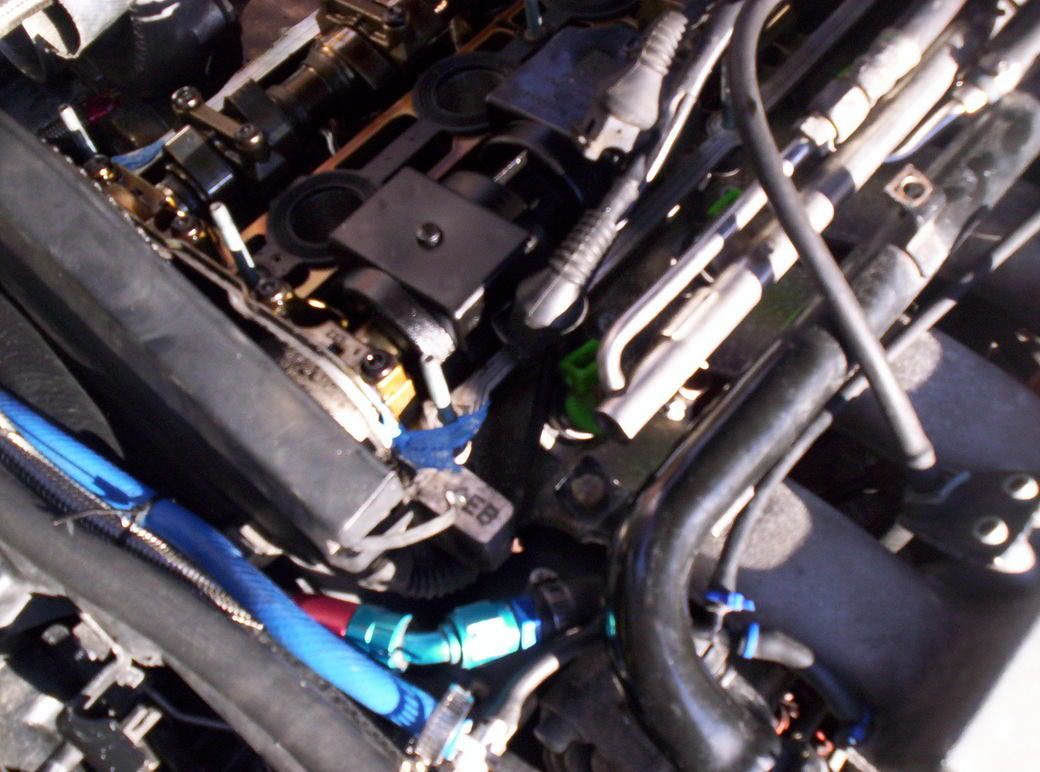
-install new oil lines, the feed is self explanatory 4an hose. The return (10an) needs to have no restriction otherwise your $1g turbo is done, and its not rebuildable! Make you own gasket for both cnc flanges, on the pan and turbo. The bolts for the pan are a major pita to tighten, I had to bend a wrench
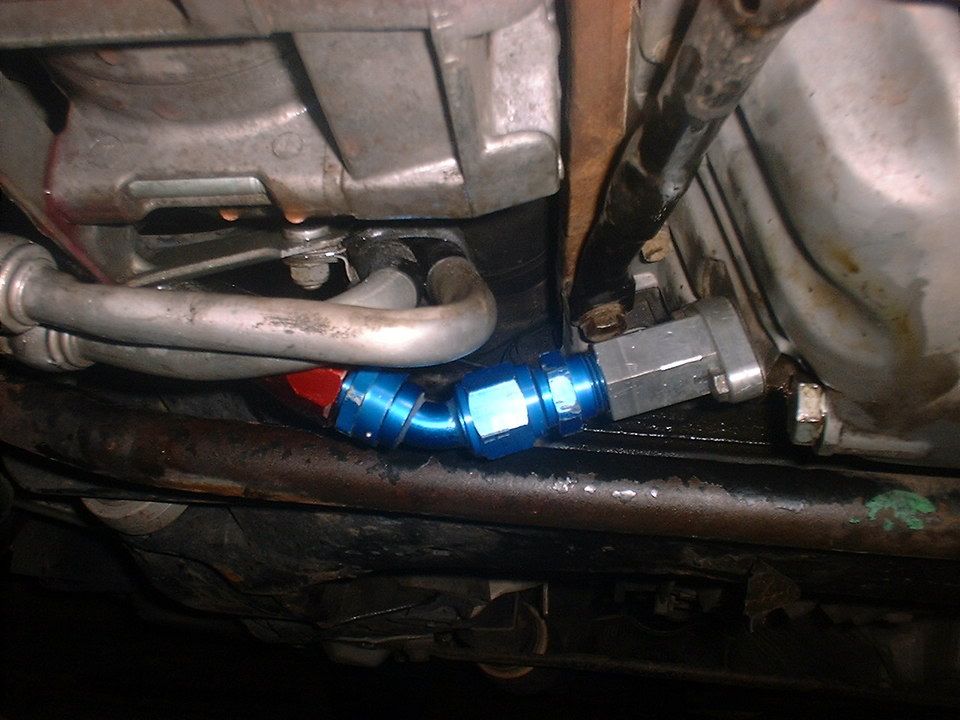
-install the coolant lines. both are 6an and will attach to the turbo via banjo fittings. For the feed, uses the barb fitting and clamp it around a rubber hose which goes to the stock location.
For the coolant return there is a pipe sticking out of the block, clamp the ss hose around this pipe
-Install exhaust manifold. I had a custom one so i had to shave off some of the head, but that shouldnt be necessary with most manifolds. install gasket and wastegate blockoff flange.
-clock turbo, to that comp housing is turned properly, This is done by very carefully looseing the nuts on the comp housing and turning. You will need to extend and twist the wastegate arm. Some people need to make a new wastegate actuator bracket but that wasnt necessary for me. Also adjust the wastegate so that it has 7-8 lbs of preload.
-Bolt turbo to exhaust manifold. Make sure you use a gasket with a fire ring. Tighten all hardware.
-Trace v-band adapter and make gaskets for the both the v-band and the 5 bolt discharge out of copper. Then bolt this up, along with the downpipe.
-Take out the maf element from the stock housing. Dremel the vr6 hosuing so that the stock element fits in. Silicone it in. Extend maf wires about 1 ft.
-Cut a 1" hole in the silicone elbow for the bypass valve return.
-find a way to connect the turbo outlet to the f-hose. I initially used a second f hose cut in half, as well as a 2" pipe with flared ends. now i have custom intercooler pipes.
-Connect the silicone 90 degree bendwith hole clamped to the maf (make sure direction is correct, then 2nd 90 degree bend, then 3" pipe, then air filter which should sit behind the passenger foglight.
-Connect maf wires and bypass valve return
-connect wastegate vac line, and boost controller.
-disconnect the n75 valve vac lines, but leave it plugged in mechanically.
-cut pcv pipe
and find a rubber bend so that the oil doesnt drip onto the downpipe or manifold
-install programming
-install injectors, fuel pressure regulator, and fuel pressure gauge. Make sure to uses fuel injection clamps on the gauge install and also make sure its on the fuel feed hose not return.
-install fuel pump, in order to make the walbro mustang pump work in the audi, you will need a piece of rubber hose to keep it tight in the pump holding contraption. Look for john baass install on audiworld.
-clean up tools, get blood off hands, drink beer,
-pull fuel pump fuse and crank over to get oil into the turbo
-install fuel pump fuse andstart up car. It will idle like ****, maybe no idle at all but it will eventually adjust. check for any leaks of anything, and fix where necessary.
*It will smoke for while
- Let it warm up and take it out for a test drive keeping a careful eye on the boost gauge (i pinned my gauge the first time due to improper wastegate preload.
Tuning
Begin by hooking up the vag-com, and start up the car remember to let the fuel pump prime before turning over. The vag is just to make sure you can see whats going on if there is any issues. It will probably idle like crap or not idle at all, but should smooth out after 15 min of driving. In my case it didnt and I spent the next 2 months playing around with maf sizes, fuel pressures, and injectors and not idle at all. I had to keep my foot on the gas the whole time which meant left foot on the clutch and right hand on the ebrake when i had to stop.
Once you get your idle set, more than likely your fuel trims have adjusted. Get out the vag-com and monitor knock sensor voltages, timing correction, o2 sensor values and any codes you may come across. Make adjustments where necessary. Remember if you start pulling alot of timing like over 9 degrees or so, you need to do something about it otherwise the motor will not last long. Also listen for knock (marbles in a tin can) I have never heard it personally but i very rarely listen to my radio now, Im always listening for knock just incase.
Check your codes and do logs very often to keep track of whats going on. fuel trims within 20% are in spec and will not throw a cel, but if possible try to keep them within -+10%. Also remeber -10% is rich, +10% is lean. A bad o2 sensor will cause the fuel trims to either not adapt, or adapt incorrectly causing clouds of black smoke, stained bumper, lots of backfires terrible gas mileage, and other problems...dont ask me how i know. Lets say once you start shooting out fire, ppl tailgaiting will no longer be a problem

Next build a pressure tester. You will be springing boost leaks like crazy...at least i am. The consists of a 2" pvc cap with a bike tire valve epoxied to it. You clamp it around the turbo outlet tube, inflate to 15psi or so and spray all vac lines and charge pipes with soapy water and check for bubbling. You may be surprised what you will find.
Some other little tricks to help with the many strange issues that come up are moving the location of your maf housing. Idealy you want at least 6" of straight tubing on each side of the maf but that not gonna happen with this set-up. Also make sure the bypass valve plumback is not entering to close to the maf otherwise it will disrupt flow, and cause bad readings and crappy idle. Another important maf thing to keep in mind is when ppl say 3" maf they are refering to 3" od which is really closer to a 2.75" id which is what is important..again dont ask how i know.
Driving Impressions
You most likely will not get in the car the first time and drive it and be shocked like most other set-ups, it runs like complete **** for a while, you tune it and gradually get it better and better, until finally you either put up a good time at the track or whoop up on some sti or corvette. Then you realize what you have done, and the grin will not be wiped off your face until the next time you break down which honestly, probably wont take long. (always, always carry extra tools, duct tape, and the sleeping bag that comes in the audi survival package
, na u shouldnt need the sleeping bag but the other stuff is very important)The car is really alotta fun, at 15psi the thing begins to haul very very quickly and by 20psi its feel unstoppable. Power comes on very smooth from a roll and is much more drivable in the corners than a chipped ko3 or ko4 because there is not a sudden torque spike. Once spooled it feels like it will pull forever. Its pulls on the highway like nothing else and you really really hafta watch your speed. Maybe I should add a valentine 1 to the list of materials needed. If properly tuned it should run mid 12s with an experienced driver (not me), so thats faster in a straight line than many ferrraris, porsches etc.
I know a guy who runs 34psi on this turbo on stock internals "when i need a thrill" He says" image driving down the highway at 30mph, punching it and getting sideways with awd from a 30mph roll." I have never done this in my car but you really do hafta be careful on wet or dusty roads because once boost begins it will occasionally break loose and get a little sideways in 1st or 2nd gear. I also have aproblem with overrevving when stuff like this happens. I have pinned my tach on several occasions. Aparently the atp rev limiter only works under load.
Overall this turbo kit will cause alot of blood sweat money (in my case credit cards, which are finally being paid off), rediculous amounts of time everyweekend, and many times stranded on the side of the road...i havent had to get towed yet but if you dont know your way around the car and how to diagnose stuff add money to the mod fund for tow trucks fees cause stuff will break! As long as you do all the work and everything you will learn alot of this as you go along, but DO YOUR RESEARCH first. What I have listed in this post is not everything you need to know, but just some of the important stuff that i remember off the top of my head.
Oh yea, if you get frustrated, put the keys down, drink a beer go to sleep and try again in the morning, you will be thinking much clearer
Heres a couple vids hopefully for inspiration.
Winter 05: ko4 -> gt28rs
Gt28rs at 16psi with many leaks